

KONSEP
Menilik dari kata "e-community" yaitu sebuah komuniti atau komunitas yang artinya perkumpulan di dunia maya.
dari kata itulah, akhirnya muncul disen kaos yang saya kirimkan, seperti contoh diatas. Gambar bulat-bulat bergerombol dan membentuk rectangle, di ibaratkan orang-orang yang bergerombol searah membentuk sebuah komunitas.
Untuk warnanya sendiri, saya mengambil warna kuning dan merah.
Kuning yang berarti optimis dan harapan, optimis dengan visi-misi yang ada dan memberi "suatu" harapan yang bisa membuat sesuatu menjadi lebih baik.
dan di dukung dengan warna Merah yang artinya Power, Energi dan Berani.
Itulah , sekelumit yang bisa saya terangkan dari gambar disen yg saya buat.
dan saya lampirkan juga alternatif disen kaosnya, dengan disen yang sama.

WISH ME LUCK ... GUYS.
Hari Senin, pada saat gw lagi nyelesain kerjaan dr kantor. Tiba-2 HP gw bunyi... dan terlihat dr nomer yg asing bg gw.
"Halo, Selamat Siang... Apakah Benar, ini Ananda Suryansyah" tanya Suara dr HP gw, lgsg gw jawab dg agak-2 bingung " Ya, saya ... sendiri" . "Ada apa...mbak?" tanya gw, setelah tau yg ngomong td ada seorang cewek.
"Saya dari PT. HAM Sampoerna, Saya mau memberitahukan...bahwa disain saudara Ananda Suryansyah telah terpilih sebagai pemenang Kompetisi Desain T-Shirt Soundrenalin 2007..."
gw, lgsg inget...ama disen yg pernah gw buat u/ kompetisi tsb, kira-2 2 minggu yg lalu.
Dan setelah percakapan dr HP tsb, gw langsung membuka site sampoerna u/ membuktikan apa .. gw bener-2 menang. Karena, rasanya gak mungkin banget...mengingat disen u/ kompetisi Soundrenalin tersebut gw selesain hanya dlm hitungan se-jam, karena...waktu itu gw taunya gk sengaja dan secara kebetulan aj klo ada kompetisi tersebut dan waktunya kurang sehari....bayangin coba. dan pesertanya...juga gk mungkin sedikit, loh...
 klik gambar biar GEDE
Setelah terbuka pages dr a-mild tsb, ...
DIENG ! dan nyatanya bener...namaku terpampang di site tsb. duh,... rasanya mimpi baget deh... hihihi, bener-2 katrok yaa...
 MIRROR
Karena bagi gw, menang dr kompetisi ini... sangat berarti, u/ mengukur kemampuan gw bahwa sebetulnya...

Hi Guys...
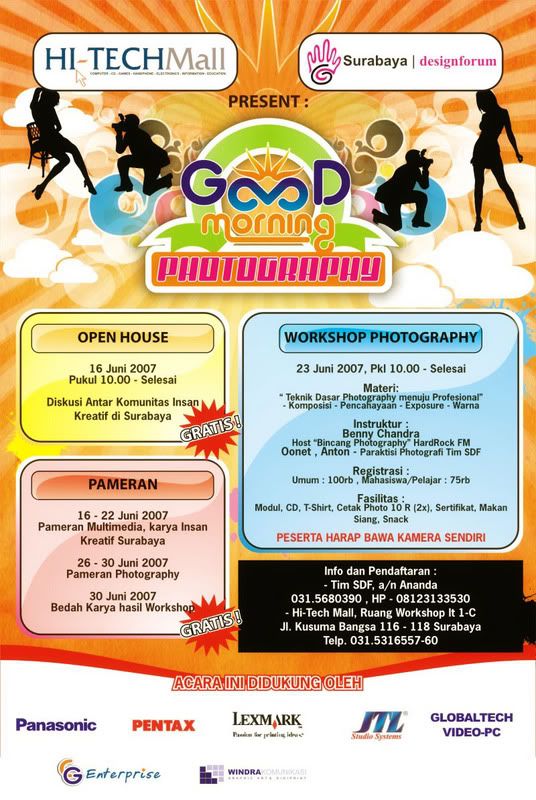
Hi-Tech Mall dan SDF (Surabaya Design Forum) mengadakan sebuah acara Open House yang di adakan pada sabtu besok tanggal 16 Juni 2007 yang mana pada acara tersebut juga di dukung beberapa Forum Grafis di Surabaya seperti IndoCG , AF-Surabaya, ADGI dan VrayKita.
Acara ini nantinya bakal mempertemukan insan-2 kreatif di Surabaya. Bahkan, gak di surabaya aja, ada insan kreatif ainaki dr malang, dan masih banyak lagi...
Kalian bisa ngobrolin apa aja disini, diskusi dengan pakar-2 desain yg ada di acara tersebut, berbagi tips n trick, dan lain-lain.
Dan Acara ini juga bisa buat ajang unjuk gigi untuk kalian. Karya kalian bisa ditunjukin disini asal sesuai dengan kriteria-2 yg ada disini. jadi... Tunjukin Karya Kmu disini, sebelum keduluan yang lain.
Bagi yg bukan anak kreatif dan bukan anggota forum, acara ini tidak tertutup buat kalian. Silahkan dateng aja... dan jangan malu yaa
intinya acara ini dibuka untuk UMUM dan GRATIS !
oia...buat kalian yg mo dateng silahkan download undangan dan formnya di..
Undangan dan Form
dan ini untuk poster Acaranya :
anyway..thanks before guys.
Dateng yaa... Rugi kalo kalian gak dateng. dan ajakin teman kalian yaa...
CU

Soon or a later someone will come to you with question: “How I can change background color in my document?”. Simple question but various answers depending on what Adobe application we are talking about.
With Photoshop is easy. Select layer, set desired foreground color and press Option/Alt+Delete. To apply background color press Command/Ctrl+Delete. Also, you can use paint bucket tool.
In Illustrator set your document size to match size of your document + bleed (if you need bleed). For example: you need to print full color artwork on A4 (297x210mm) including 5mm bleed on each size of your document. In this case your document size will be 307x220mm and you will enter this values in the New document window.
Now, go to Object – Crop area – Make.
Repeat this step again but choose Release(Object – Crop area – Release).
You will see rectangle with no stroke and no fill covering your document. All you have to do now is to click on the desired swatch (it could be a pattern, too) and you will get colored background.
Extra tip: create action in Illustrator to do this job automatically for you.
In InDesign, set your document size as we mentioned earlier for Illustrator.
Now, go to Cari Jansen web site and download script called 0 pt Border All Pages v2.jsx.
http://carijansen.com/scripting/index.php
Install script to your scripts folder \Adobe InDesign CS2\Presets\Scripts. Open InDesign and open scripts palette: Window – Automation-Scripts (InDesign CS2). Double click the script name and drag swatch color or pattern from swatches palette to your document. In the layers palette you will see new layer called “The Border Layer”.
Kali ini gw akan ngasih tutorial pada lo-2 semua yang ingin ngasih kado spesial buat cewek or cowok lo semua. Yaitu ngasih kado poster foto cewek or cowok lo yang udah ditracing se-ukuran tembok kamar. nah..loh ! kebayang kagak, gimana reaksi cewek or cowok lo...? mau coba ? nah, begini caranya? persiapin dulu fotonya, pilih yang menurut lo yang terbaik, disini gw pilih ini
 dari beberapa foto yg gw ambil pake camera-handphone. Setelah lo dapet foto mana yg lo butuhkan, sekarang lo masuk program edit photo, yaitu Photoshop. buka photo pilihan lo disitu, lalu edit gambar agar batas (line) rambut biar lebih terlihat. Klik Image - Adjustment - Curves (ctrl+M).
 lalu ubah path curve seperti pada gambar berikut.
 dan hasilnya akan seperti ini.
 Save (ctrl + shift + s) jadi JPG .
 Setelah itu lo tracing foto tersebut di software lain, disini gw pake CorelDraw 12. Import (ctrl + i) gambarnya.
 trus klik kanan pada image-nya, pilih Locked image.
 Tracing gambar dengan menggunakan Tombol Freehand (F5).
 dan tracing gambar tersebut dimulai dengan warna yg lebih gelap dahulu. Kasih warna "blank" dg outline yang terang Disini gw tracing rambutnya, contour wajah, alis-mata, bibir, lalu contour shadow dahi, mulut dan mata.


 setelah itu pewarnaan.
Selesai... hehehe. iya, tinggal ngrapi'in shadow dan ngilangin outline. Ok, sekarang u/ ngrapi'in shadow. Klik objek yang mau dibuat shadow, lalu klik tombol "Interactive Transparency Tools".
 Perhatikan typenya ganti dengan mode "Uniform" dengan nilai "80"
Untuk ngilangin outline secara keseluruhan, seleksi semua objek lalu tekan (alt + enter) disitu keluar tab baru yaitu "Objek Properties" liat gambar bawah.

Selesai. Mudah, bukan...?
Pick color from picture in InDesign

While you are working in InDesign it's essential to know how to pick color from image you just placed because of need to experiment with objects colors surrounding placed image. First of all the solution must be quick and easy. Here is how you can do it.
Place RGB image in your InDesign document (Cmd/Ctrl+D).
Open your color palette - (Window-Color).
Select color picker and click on desired part of image.
Now, color palette will change from CMYK mode to RGB mode.
Double click on the fill rectangle in color palette to open Color Picker window. You will see option "Add RGB swatch". But, we need here option to add CMYK swatch and this will be available if you just place your cursor and click inside cyan field. Finally, click on the "Add CMYK swatch" button.

Your new swatch will be available in swatches palette. Double click this new swatch in swatches palette to open swatch options. You will se that we have a little problem. Numbers I got for cyan, magenta and yellow are not acceptable for us who care that everything must or almost be perfect.
This problem is easy to fix if you just hold Shift key and click on one of the sliders for color where you have the problem (in my case I clicked on Magenta).

That's it. Easy and clean way to extract desired color from image and to convert RGB color to CMYK.
Basic tips on working with tables in InDesign CS2
InDesign’s table options gives you ability to change many settings when you need to work with tables. First of all this tutorial is based on using InDesign CS2. I am hoping these tips will work in earlier versions too.
As a the first step we will create a simple table. To do that pick your type tool and draw text frame where you want your table to be placed on the page.
Go to table menu and select Insert table with settings: Body rows – 3; Columns – 2; Header rows – 0; Footer rows – 0;
You have changed your mind and now want 3 rows more. For this place your cursor in the last cell and press Tab key on your keyboard as many times as you want additional rows to be added to your table below the last row.

If your table disappeared from the screen pick the selection tool and click on the page where your table was when you created it. You will see rectangle and all you have to do to see your table again is to click on “Fit frame to content” button at the right hand side of the tool palette.

Now we are going to alter strokes on some rows using proxy preview area.
Select your table or individual rows and you will see proxy preview area on the right hand side of the tools palette. (Also, for larger view you can open your strokes palette.)
Reset the proxy palette so no blue lines are visible. I found that three fast clicks will reset it. Now select top line and apply stroke weight and style as you wish. After these effects has been applied go back to your proxy area and deselect blue line. So, you first reset palette then select what you want to change and finally deselect line/s at the proxy preview area. Now you can go forward.

Okay! How we could copy stroke and fill from one cell or row to another cells or rows?
I have one body row with stroke weight 5 pt and dotted stroke style applied on the top and bottom. But now I want to apply this style to individual cells no matter where they are.
Deselect everything and select color picker. Click on the cell from you are going to copy style effect and you will notice how picker change appearance.
Now all you have to do is to click in the center of the cell/s and hold mouse button until you see that the cell is selected.

To add color to individual cells you can drag and drop your swatch from swatches palette to center of the cell in order to change fill or to stroke to change the stroke color. During this you will see how your cursor change.


I thought you'd all like to know that Adobe just released a beta version of Photoshop CS3 for general download. The installer is unlimited as long as you have a valid PS CS2 or Creative Suite 2 serial number else it's a 30 day trial.
From my initial exploration there doesn't seem to be a lot of new stuff in this version, apart from a nice new interface and a new variables framework which I have no idea how to use yet.
Obviously one of the big things for Intel Mac users is that it's a Universal Binary. Finally!
This is one press release from Adobe I read from A to Z. Exciting and much waited stuff! If you just want the link: Download here. For screen shots click here.
Company Also Previews Adobe Bridge and All-New Adobe Device Central
SAN JOSE, Calif. — Dec. 14, 2006 — Adobe Systems Incorporated (Nasdaq:ADBE) will introduce a beta version of Adobe® Photoshop® CS3 software, the next release of the world standard in digital imaging, on Friday, December 15th. Adobe is delivering a widely available Photoshop CS3 beta to enable customers to more easily transition to the latest hardware platforms, particularly Apple’s new Intel-based systems. The beta is available as a Universal Binary for the Macintosh platform, as well as for Microsoft® Windows® XP and Windows Vista computers. The final shipping release of Adobe Photoshop CS3 is planned for Spring 2007. The software can be downloaded at: http://labs.adobe.com , in the early hours Pacific Standard Time on December 15.
Packed with new features, Photoshop CS3 beta also includes a pre-release version of a major upgrade to Adobe Bridge, as well as a preview release of the all-new Adobe Device Central. Photoshop customers can use Adobe Device Central to design, preview, and test compelling mobile content, created specifically for smaller screens. This new tool, integrated in the Photoshop CS3 beta, simplifies and accelerates the creation of mobile content through a preview environment and built-in device profiles.
“This is an exciting time for the Mac, and Adobe wanted to ease the move to new Intel-based systems with a preview release of Photoshop CS3,” said John Loiacono, senior vice president of Creative Solutions Business Unit at Adobe. “We didn’t want to leave Windows customers out of the party, so the beta is available to everyone in the creative industry's most passionate user community -- no matter what their platform choice. We still have some surprises in store, but this beta gives customers an early chance to see the power of another great Photoshop release, optimized and tuned to run natively on the latest hardware and operating systems.”
To utilize Adobe Photoshop CS3 beta, customers require a serial number from either Adobe Photoshop CS2, Adobe Creative Suite® 2, Adobe Creative Suite Production Studio, Adobe Design Bundle, Adobe Web Bundle or Adobe Video Bundle. Adobe Photoshop CS3 beta is available in English only. Customers who have a valid serial number for all other language versions of qualifying Adobe products can download the software. Without a serial number, users can still download Adobe Photoshop CS3 beta, with the product expiring after two days. Customers must register online with Adobe or have an existing Adobe.com membership account to access the software.
In related previews of future technologies, Adobe has also released two new web tools as beta releases. Adobe CSS Advisor is a new web-based community site to easily identify and resolve browser compatibility issues. Web designers and developers can contribute their own issues, comment on existing issues, or become an editor to participate in driving the site's future. The site is accessible at: www.adobe.com/go/cssadvisor . Also introduced is a beta release of Adobe Spry framework for Ajax, a designer-focused solution for adding the interactive power of Ajax when developing rich, dynamic web-sites. Adobe Spry framework for Ajax is available at: www.adobe.com/go/spry .
System Requirements
For Adobe Photoshop CS3 beta, recommended system requirements are as follows. For Macintosh: Mac OSX 10.4.8 or 10.5, 1 GHz PowerPC® G4 or G5 processor, Intel based Macintosh. For Windows: Intel® Xeon® , Xeon Dual, Centrino® or Pentium® 4 processor, Microsoft Windows XP with Service Pack 2 or higher, Microsoft Windows Vista. Both platforms require 512 MB RAM and a 1024x769 resolution screen. Photoshop CS3 beta will expire soon after the launch of Photoshop CS3 in Spring 2007. Details on final pricing, system requirements and availability have yet to be determined.
About Adobe Systems Incorporated
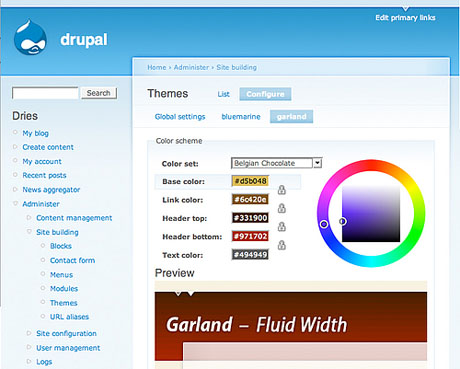
Drupal released their first beta of the next version of Drupal called 5.0
Some significant changes including a new core theme and a web installer for making it easier to install Drupal. Lots of performance updates too!
completely retooled the administration page
- /admin now contains an administration page which may be themed
- reorganised administration menu items by task and by module
- added a status report page with detailed PHP/MySQL information
added web-based installer which can:
- check installation requirements
- automatically generate the database configuration file
- install pre-made 'install profiles' or distributions
- import the database structure with automatic table prefixing
be localized
System
- added new default Garland theme
- added color module to change some themes' color schemes
- included the jQuery JavaScript library 1.0.2 and converted all core
JavaScript to use it
- introduced the ability to alter mail sent from system
module system:
- added .info files for module meta-data
- added support for module dependencies
- improved module installation screen
- moved core modules to their own directories
- added support for module uninstalling
- added support for different cache backends
- added support for a generic "sites/all" directory.
usability:
- added support for auto-complete forms (AJAX) to user profiles.
- made it possible to instantly assign roles to newly created user accounts.
- improved configurability of the contact forms.
- reorganized the settings pages.
- made it easy to investigate popular search terms
- integrated urlfilter.module in filter.module
block system:
- extended the block visibility settings with a role specific settings.
- made it possible to customize all block titles
poll module:
- optionally allow people to inspect all votes.
- optionally allow people to cancel their vote.
distributed authentication:
- added default server option.
- added default robots.txt to control crawlers.
database API:
- added db_table_exists().
blogapi module:
- 'blogapi new' and 'blogapi edit' nodeapi operations.
user module:
- added hook_profile_alter().
- e-mail verification is made optional.
- added mass editing and filtering on admin/user/user.
PHP Template engine:
- add the ability to look for a series of suggested templates.
- look for page templates based upon the path.
- look for block templates based upon the region, module, and delta.
content system:
- made it easier for node access modules to work well with each other.
- added configurable content types.
- changed node rendering to work with structured arrays.
performance:
- improved session handling: reduces database overhead.
- improved access checking: reduces database overhead.
- made it possible to do memcached based session management.
- omit sidebars when serving a '404
- Page not found': saves CPU cycles and bandwidth.
- added an 'aggressive' caching policy.
- removed the archive module.
upgrade system:
- created space for update branches.
forms API: - made it possible to programmatically submit forms.
improved api for multistep forms.
theme system:
- split up and removed drupal.css.
- added nested lists generation.
- added a self-clearing block class.
hmm... Hari Kemenangan datang, bahkan udah lewat satu minggu-an tapi ritual kirim e-card lebaran, SMS, saling mengucapkan antar temen masih berkelanjutan.
Salah satunya saya, saya menerima bejibun e-card lebaran, tapi gak ada sesuatu pun yang unik ato lain dari yang lain, kata-2nya juga itu-2 aja.... hmmm... basi.
semua tau-lah...kalo hari ini lebaran, harus saling mema-afkan, tapi ini-kan momen dimana kejadiannya cuman satu taon sekali...ya mbok, bikin e-card itu yang fenomenal gitu dengan kata-2 yang nyelekit, yang unik..dari yang lainnya. biar temen yang kita kirimin itu merasa kaget dan heran...wahaha.
jangan takut membuat suatu perubahan.
nih contoh e-card yang aku buat untuk temen-2 aku... yang pada akhirnya banyak feed back ke-saya.

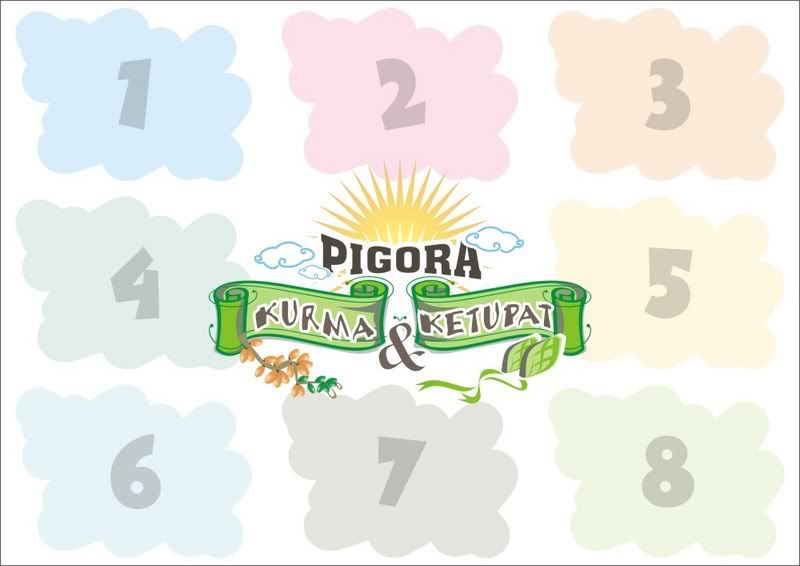
sebenernya karikatur ini....dibuat untuk pigora yang saya buat khusus Lebaran ini.

Rutinitas membuat kartu lebaran .. kayaknya udah gak asing lagi buat desainer seperti saya, ato mungkin juga berlaku untuk desainer yang lain. Karena saban tiap taon kantor saya mengirimi klien-kliennya dengan kartu lebaran beserta parsel... ya itung-itung kita mengembalikan jatah (uang) beberapa persen ke klien.
tapi bukan masalah itu yang membuat saya untuk menulis diblog saya ini... tapi
Ini sih pikiran iseng... di sela-2 membuat kartu lebaran tersebut, saya sempat berpikir kenapa sih, icon untuk kartu lebaran...kalo gak Ketupat ya pasti Masjid.
Ketupat dan Masjid...apa hubungannya? wong di bulan puasa kita malah jarang makan Ketupat, apalagi Masjid...apa di bulan puasa aja, kita sering ke Masjid, di bulan-bulan berikutnya malah absen. apa begitu penjelasannya ?
Kenapa kok... gak malah buah Kurma yang jadi Icon Kartu Lebaran, yang menurut saya mungkin lebih cocok, karena cuman dibulan puasa aja... musim kurma, dan kita makan buah tersebut.
hmmm... coba ah, taon depan saya buat icon buah kurma tersebut.
Yang mungkin bisa buat Trend setter untuk icon kartu lebaran selanjutnya...
who knows ... ?!

I am a young designer but hope to bring a new perspectives to world of desaigner. There are many ways of promoting yourself and your services whether in print or on the internet. I am going to look at the different methods of doing this...
Word of Mouth
This is the advertising strategy that everyone loves designers especially, no effort needed. When you print and design someone business cards, throw in some of your own! Networking can help your word of mouth promotion, make sure everyone knows what you do friends, family, neighbors, local businesses, and former clients (Make sure they know the whole range of services).
Online Communities
Join a local business forum or branch worldwide and reach out and join a worldwide forum. Things like your local town/city/villages website eg www.stradbroke.org.uk. Or if you specialize in a certain area, a service related website eg www.wordlab.com/wordboard. Other online communities where you can meet other designers like www.meetup.com.
Website
If you don't have a website you had better get one! Your clients will expect you to have a web presence and most of my clients come to me by way of my website. 90/95% of my clients will come to me via my website and almost 100% of my clients will come from outside even the uk!
Direct Mail
Target the naive market you want to target and send them a postcard, flyer or brochure about you and what you do. I haven't done a direct mail piece but some friends send them every five years and get a reasonable amount of attention from them.
Online Directories
Make use of directories! What more could you want they are free mostly and will display your link for usually a small banner ad. So what you could do is make a page of these banner ads and hide it away. They are an easy way to get your name and contact information out there to possible clients... and there are so many.
Competitions
Getting your name known will increase your web chatter among other designs and it will spread like wildfire. The main part of my advertising budget goes towards the fee's of these things. Having your artwork honored and being printed in design books will allow you to brag in your publications and allow clients to look in these books and say "Hey I like that designer lets contact him I've got some work I need doing".
Press Releases
Another major method of advertising and marketing yourself is a press release or newsletter style updates email. Make a list of clients, editors and community editors and email them about your business advertising offers, design awards and other stuff similar.
Charity Work
Now I bet your thinking what do i get out of it...everybody does. You will get more out of charity work most of the time than normal work apart from the monitory factor. You should get all the credit on the pieces being produced for the organization. You also have the opportunity to meet people business leaders and people in the community for who serve the company. Free Work for Profit ventures is a big NO! Telling a company you will work for free will encourage the fact that your work is worthless not priceless.
Paid Print advertising
Humm not a fan of this one but but some companies and designers swear by it. I don't do any paid printing advertising but it would include things like yellow pages and local village/town magazine. The quality of the advert is usually crappy and it has a limited audience.
Cold Calling
"The process of approaching a potential customer without any previous introduction or contact with a view to selling to them. Cold calling is usually conducted by telephone or in person." Google Define
This is at the bottom of my list, I do not enjoy cold calling. Over the time i have been a designer I have received no clients at all by doing this and it makes you seem rather desperate.
I hope this helps you sell yourself I'm not telling you to go out and buy a billboard for your business but these little things can lead up to a large image and presence of your business.
PDF presentasi sudah semakin populer dan menjadi pilihan pada waktu akan melakukan presentasi. Mungkin, cepat dan mudah mengirim file ke klien adalah salah satu faktor yang membuat PDF presentasi ini semakin banyak dibuat pilihan para presentator pada sebuah presentasinya.
Untuk membuat PDF presentasi, kamu harus punya beberapa file JPG yang telah siap, yang nantinya akan dimasukkan kedalam file PDF tersebut.
Caranya:
- Tentunya, buka dulu Photoshopnya... (disini saya memakai Photoshop CS)
- Lalu, buka semua file yang mau dijadikan PDF presentasi.
- Pilih File/ Automate/ PDF Presentation.

- Kamu akan mendapatkan window seperti ini.

- Aktifkan atau centang "Add Open Files". File-file tersebut bisa kamu atur tempatnya sesuai urutan sebenarnya, lalu pada "Output Options", disini kamu bisa memilih antara Multi-Page Document dan Presentation. Tergantung kebutuhan, disini saya memilih "Presentation", dengan delay 5 detik setiap filenya dan Loop saya aktifkan. lalu "Save".
- lalu keluar window baru.

- Pada "Encoding Option", aktifkan atau centang pilihan JPG dengan quality "10". Kalau file PDF-nya nanti mau dikasih password, kamu bisa centang di pilihan "PDF Security" lalu klik "Security settings".... klik OK.
- Selesai.
When I work in Photoshop I quickly end up having dozens of layers. It's good to keep every possible thing on it's on layer, but at the same time it becomes increasingly difficult to navigate them. Thankfully Photoshop allows us to group our layers into layer folders.
The quickest way to get organized is to just select all the layers that belong to each other and simply drag them into the folder icon on the bottom of the layer palette. This operation will create a new folder and places all the layers into it. Next, name the folder, so you know what it contains.
In my normal workflow I keep adding new layers for every element of my layout and when I feel a certain object with it's all layers is complete, I just group them into a folder and get them out of the way. If the number of such folders becomes big, you can further simplify your document by either coloring the folders to get a better overview or grouping the folders themselves into higher level folders. I think Photoshop CS2 has an unlimited depth of folders. Of course the deeper you go the more clicking you need to do if you want to expand the structure.
 - SUPERMAN RETURNS -
 WooW....
Yang pasti Film ini sangat menarik untuk ditonton apalagi durasi-nya cukup lama sekitar 154 menit... dalam waktu yang segitu panjang dan disuguhi adegan-2 yang sangat apik yang menimbulkan decak kagum para penonton dan membuat betah untuk duduk manis gak beranjak kemana-pun.
Dari segi kualitas dan efek screen, saya sendiri sangat kagum dengan efek-2 yang timbul. seperti adegan Superman mengejar pesawat yang mau jatuh, ditembaki dengan mesin gun, berkejaran dengan api yang mau meledakan pabrik gas, lalu menerobos awan dan lautan dengan sinar x-nya....
Selain menceritakan kehebatannya...di film ini diperlihatkan juga kelemahan Superman. yup ...bener, dengan batu kripton. di sekuel ini Superman dibikin mati olehnya, dan yang membikin penasaran di film ini...ternyata Superman udah punya anak hasil hubungan dengan Lois Lane pada 5 tahun yang lalu.
Saya disini tidak bisa menceritakan semuanya...tapi alangkah baiknya jika kalian tonton sendiri..hehehe.

Reviews:
- Pixars "music men" told the story of the studios animated short film.
- Short and Sweet: Artists and filmmakers test new styles, equipment, and ideas with...
- Portfolio: Jiri Adamec
- etc...
Download This Magz !


dan

Sehari setelahnya... uh, ada perubahan konsep malahan jauh dari konsep semula.

mudah-2 an sesuai dengan apa yang dimaksudkan.
buat temen-2.... what do you think !